How to Wire a 3-Prong Toggle Switch
A comprehensive guide to safely wiring your toggle switch
Safety Warning
Always turn off power at the circuit breaker before working with electrical wiring. If you're not comfortable with electrical work, consult a qualified electrician.
Understanding 3-Prong Toggle Switches
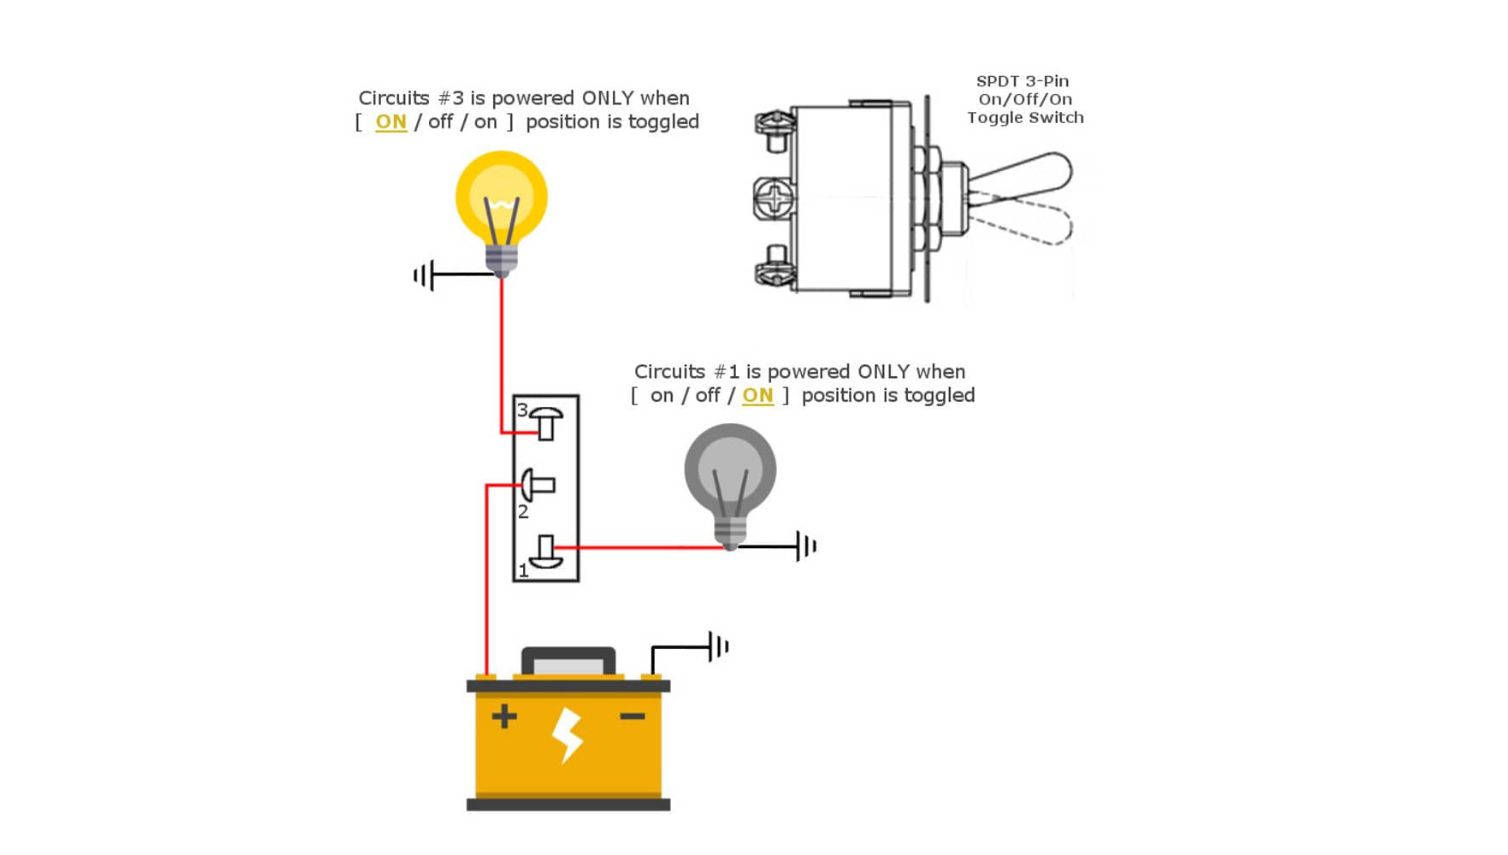
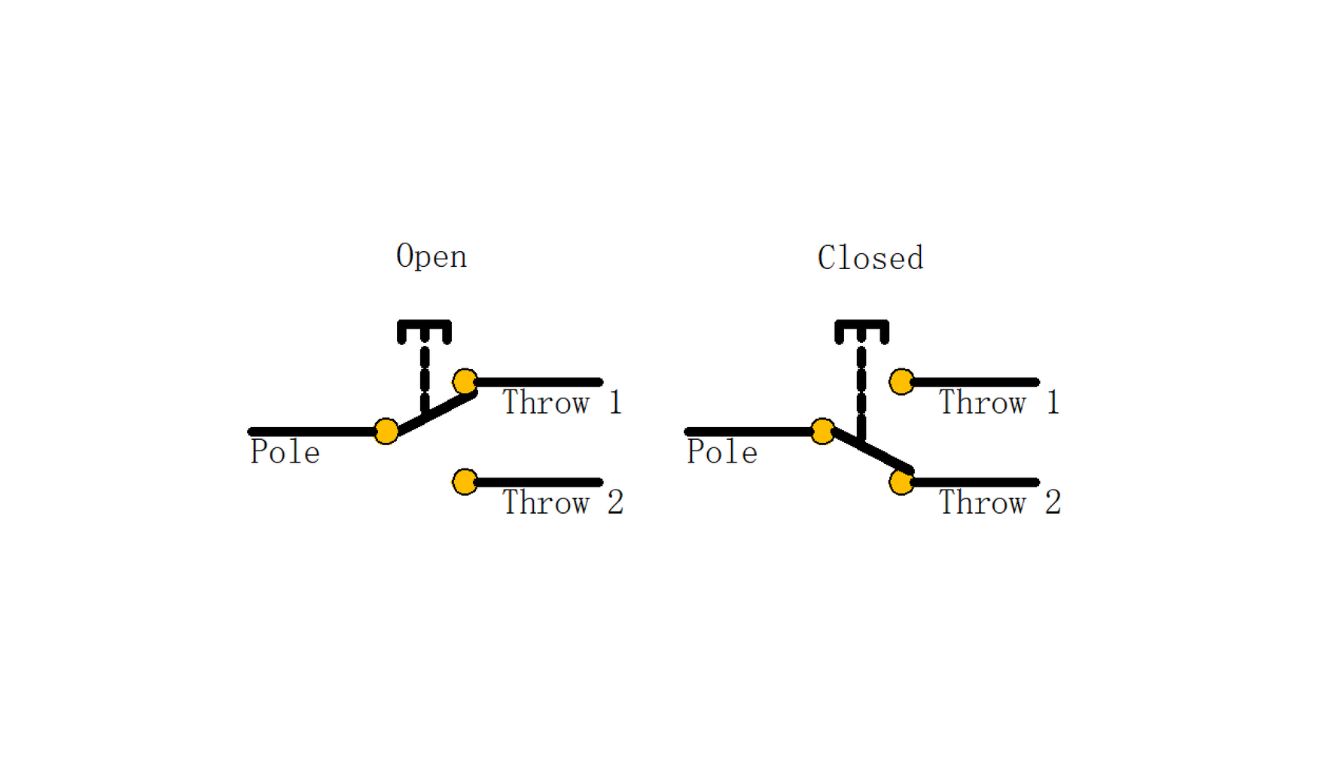
A 3-prong toggle switch, also known as a Single Pole Double Throw (SPDT) switch, has three terminals that allow you to control two different circuits or switch between two power sources.
Terminal Identification:
- Common (COM): Center terminal - always connected
- NO (Normally Open): Connected when switch is in one position
- NC (Normally Closed): Connected when switch is in opposite position
Tools and Materials Needed
Tools
- • Wire strippers
- • Screwdriver set
- • Voltage tester
- • Wire nuts
Materials
- • 3-prong toggle switch
- • Electrical wire (appropriate gauge)
- • Wire connectors
- • Electrical tape
Safety
- • Safety glasses
- • Insulated gloves
- • Circuit breaker lockout
- • Flashlight
Step-by-Step Wiring Instructions
Step 1: Turn Off Power
Locate the circuit breaker that controls the circuit you'll be working on and turn it OFF. Use a voltage tester to confirm power is off.
Step 2: Identify Your Wiring Configuration
Common Configurations:
- • Single light control with two circuits
- • Fan speed control
- • Two-way switching between power sources
- • Motor direction control
Step 3: Prepare the Wires
Strip about 3/4 inch of insulation from the end of each wire. Twist the exposed copper strands together to prevent fraying.
Wire Color Coding (Standard):
Step 4: Connect the Wires
Basic Connection Method:
- Connect power source to COM terminal
- Connect first load to NO terminal
- Connect second load to NC terminal
- Connect all neutral wires together
- Connect all ground wires together
Connection Tips:
- • Tighten terminals securely
- • Ensure no bare wire is exposed
- • Double-check all connections
- • Use wire nuts for splices
Step 5: Test the Installation
After completing all connections, carefully restore power and test the switch operation.
Testing Checklist:
- □ Switch toggles smoothly between positions
- □ Only one circuit is active at a time
- □ No sparking or unusual sounds
- □ All connections are secure
- □ Switch mounting is stable
Common Applications
Ceiling Fan Control
Switch between fan and light circuits, or control fan direction.
Dual Light Control
Control two separate light circuits with one switch.
Motor Direction
Reverse motor direction for pumps, fans, or other equipment.
Troubleshooting Common Issues
Problem: Switch doesn't work in one position
Possible causes: Loose connection, faulty switch, incorrect wiring
Solution: Check all terminal connections, verify switch with multimeter, review wiring diagram
Problem: Both circuits operate simultaneously
Possible causes: Incorrect wiring, switch malfunction
Solution: Verify COM terminal connection, check for crossed wires, replace switch if defective
Problem: Switch feels loose or wobbly
Possible causes: Loose mounting, worn switch mechanism
Solution: Tighten mounting screws, check switch box attachment, replace if mechanism is worn
Quality Toggle Switches from Goboll Electronics
Since 1989, Goboll Electronics has been manufacturing high-quality toggle switches with certifications including UL, VDE, TUV, KC, ETL, CE, and more. Our 3-prong toggle switches are designed for reliability and long-lasting performance.
Contact us for your toggle switch needs:
📧 Email: [email protected]
📱 WhatsApp: +86 13285879777